As YouTube supports MP4, FLV, AVI format well. Many converters claim that they can convert MKV to MP4 to solve the problem. Well, don't you think it's a little energy and time-consuming? With powerful Video Converter Ultimate, you can directly convert MKV to YouTube supported video format without any other procedure. Here shows you how to make it step by step.
To share MKV to YouTube without any hassle, a suggestion is to use Dimo Video Converter Ultimate to transcode MKV to YouTube most compatible format. With this MKV to YouTube video converter, you not only can convert MKV video to FLV, MOV, WMV, MPEG-4, compatible with YouTube, but also can divide your large MKV files into shorter 15 min sections( YouTube has a 15 min limit in usual.) And if you are a Mac user, please get Dimo Video Converter Ultimate for Mac, which helps you convert and upload MKV video to YouTube on Mac (OS Sierra, El Capitan included). Now we share the step-by-step solution converting/uploading MKV files to YouTube.
Free Download Dimo Video Converter Ultimate (Win/Mac):


Other Download:
- Cnet Download: http://download.cnet.com/Dimo-Video-Converter-Ultimate/3000-2140_4-77472903.html
- Soft32 Download: http://dimo-video-converter-ultimate.soft32.com/
- Top4download: http://www.top4download.com/dimo-video-converter-ultimate/nsyrihrb.html
- Softpedia Download: http://www.softpedia.com/get/Multimedia/Video/Encoders-Converter-DIVX-Related/Dimo-Video-Converter-Ultimate.shtml
- windows7download: http://www.windows7download.com/win7-dimo-video-converter-ultimate/bpphgnww.html
Step 1. Load source files
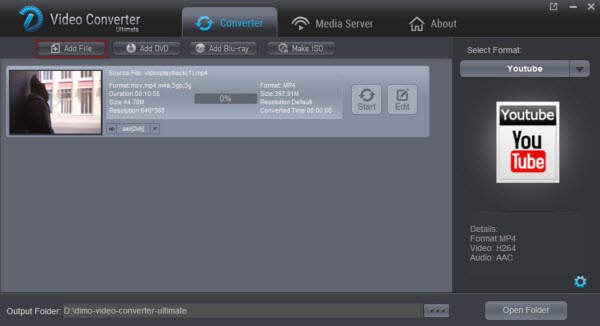
You can either click "Add File" button to import MKV files you want to upload to YoubTube. Also you can directly drag and drop the files into this program.

Step 2. Select YouTube format
Go to the "Format > Web" category and select the "YouTube" format. This will have your video converted to the format best for uploading to YouTube. The H264 will be used as its video codec and the AAC as its audio codec.
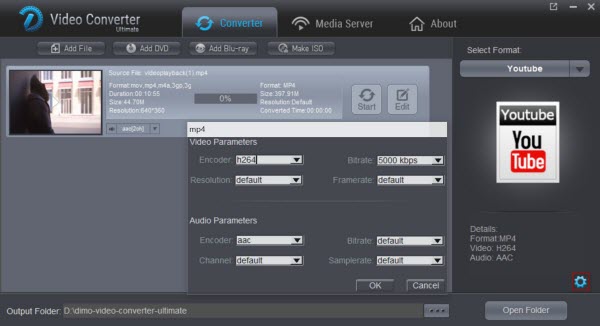
Tip 1: For more control, you can enter the "Settings" button to adjust the video and audio parameters like video codec, audio codec, bit rate, frame rate, sample rate, video size, etc. For novices, you can ignore these since the default settings produces a great result.

Tip 2: Click Edit button and you can trim, crop or adjust the video with the built-in video editor to get the very part and effect of the movie you want. And if the video clips you've trimmed are still longer than 15 minutes, you can choose to split the MKV video into smaller parts so as to share on YouTube without limit.
Step 3. Start encoding MKV to YouTube formats
Click "Start" button to start encoding MKV for uploading to YouTube. After the conversion, click "Open" button to get the exported files and then upload the converted MP4 files into YouTube for sharing with your friends, families, and fans. Now, all the following uploading MKV to YouTube issues will be solved.
- Unnecessary delay in uploading file
- After a long time of the initial trial for uploading file, a line appears on the screen saying, "Unsuccessful uploads", "Request Timed-out", "Error" and some others.
- Sometimes you find a statement which appears on the screen and says, "File format not recognized".
Free Download or Purchase Dimo Video Converter Ultimate:


Kindly Note:
The price of Dimo Video Converter Ultimate for Windows is divided into 1 Year Subscription, Lifetime/Family/Business License: $43.95/Year; $45.95/lifetime license; $95.95/family license(2-4 PCs); $189.95/business pack(5-8 PCs). Get your needed one at purchase page.
Contact us or leave a message at Facebook if you have any issues.
Related Articles:
- How to Upload WMV to YouTube Effortlessly
- How to Upload Canon 5D Mark IV 4K to YouTube
- YouTube Funniest Kids Videos Free Download Tutorial
- How Can I Watch 3D YouTube Videos on Samsung Gear VR
- How to Download and Convert YouTube Video to MP4 Effortlessly
- Convert and Upload QuickTime MOV to YouTube on macos Sierra
No comments:
Post a Comment