Why Can't Watch 3D Movies on Oculus Rift CV1?
Oculus Rift CV1 by default supports most common file formats including MKV, MP4, AVI, and FLV. When it comes to playing 3D videos or movies, Oculus Rift CV1 requires either side-by-side or top-to-bottom (top down), but many movies are not that format. Thus, the workaround is to download a 3D video converter program that can convert 3D movies to Oculus Rift CV1 supported formats.
To finish task, here we recommended you to try Dimo Video Converter Ultimate, a professional video converter for Rift CV1. It enables you convert various 3D movies including 3D Blu-ray, 3D YouTube FLV, 3D YIFY, 3D MTS, 3D MKV, etc. to Oculus Rift CV1/DK2 or Oculus video format at super fast speed. It supports Anaglyph, Top-Bottom, Side-by-Side for Oculus Rift, 3D TV, Gear VR, DayDream View, HTC Vive, Google Cardboard, etc. with the best quality.
What's more, with the built-in editor, you can trim, crop, add watermark, adjust special effect to your 3D video, so that you get the very part and effects at your will. If you are a Mac user, you can turn to Dimo Video Converter Ultimate for Mac (OS Sierra, OS X El Capitan included), which has the same function as the Windows version. Free download the right version and see easy steps to watch 3D movies on Oculus Rift CV1 with Oculus Video effortlessly.
Free Download Dimo Video Converter Ultimate (Win/Mac):


Other Download:
- Cnet Download: http://download.cnet.com/Dimo-Video-Converter-Ultimate/3000-2140_4-77472903.html
- Soft32 Download: http://dimo-video-converter-ultimate.soft32.com/
- Top4download: http://www.top4download.com/dimo-video-converter-ultimate/nsyrihrb.html
- Softpedia Download: http://www.softpedia.com/get/Multimedia/Video/Encoders-Converter-DIVX-Related/Dimo-Video-Converter-Ultimate.shtml
- windows7download: http://www.windows7download.com/win7-dimo-video-converter-ultimate/bpphgnww.html
Step 1. Load 3D movies
Launch the VR video converter for Rift CV1, and click "Add File" button to import your source materials 3D media files.
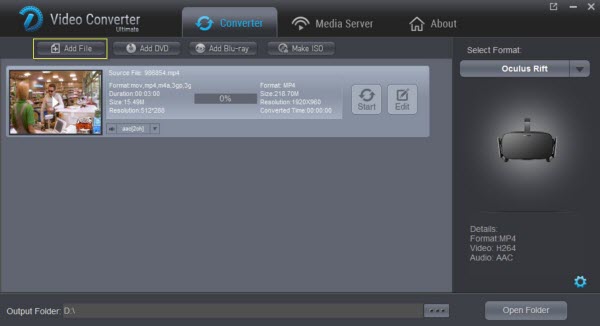
Step 2. Select output format
It is time to select the output file format type that will be Oculus Rift VR device in your case. Click "Select Format" and select "Oculus Rift" from "Device > VR" category as the output format. It works on Oculus Rift CV1 perfectly. Choose the output file folder where you need to save back your video file after conversion.
Tip: Click Settings to adjust the parameters like video codec, video bitrate, video frame rate, audio sample rate, audio channel. 1920x1080 compressed side-by-side 3D should be resampled to 1920x540 resolution full side-by-side resolution. And keep audio in AAC or MP3.
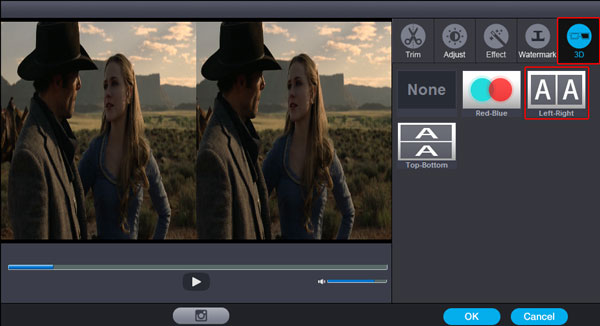
Step 3. Set the Matching 3D modes
The 3D Video Converter program provides three kinds of 3D effects, you can choose one that match your Oculus Rift CV1, such as Side-by-side (Left-Right) or Top-Bottom.
Step 4. Start conversion
Click the "Start" button to start and finish the 3D video to Rift CV1 conversion. After the conversion, click "Open" button to quickly locate the generated media file. Now you can transfer the converted 3D videos to play with Rift CV1 easily.
Follow the official instruction to play 360 videos or 3D content in Oculus rift:
1. Label 3D videos and 360 videos as:
a. The 360 videos are here implemented using advanced spherical mapping; for this you simply need to add _360 at the end of your video file name. After completion of this labelling process you can move these videos to video folder as per need.
b. In case of 3D panoramic videos, you need to add labels as per top, bottom, left and right conventions. The extensions at the end of video file name will be “_360_TB.mp4”, “_360_RL.mp4”, “_360_BT.mp4” and “_360_LR_mp4” etc. It is important to provide proper names to these videos files for easy access at later stages.
2. Here are the steps to transfer your videos to Oculus Videos
a. Open the Windows system drive that is probably C drive in most of the cases.
b. Now access Users folder.
c. Choose user files option ahead.
d. Finally locate and then open Videos folder and paste your videos there.
For the next time, whenever you will launch the Oculus Video then these transferred videos will immediately and automatically appear on My Videos section of your system.
Free Download or Purchase Dimo Video Converter Ultimate:


Kindly Note:
The price of Dimo Video Converter Ultimate for Windows is divided into 1 Year Subscription, Lifetime/Family/Business License: $43.95/Year; $45.95/lifetime license; $95.95/family license(2-4 PCs); $189.95/business pack(5-8 PCs). Get your needed one at purchase page.
Contact us or leave a message at Facebook if you have any issues.
Related Articles:
No comments:
Post a Comment