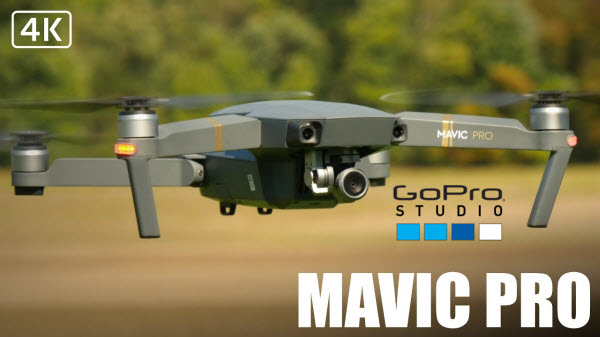
DJI is perhaps the current leader in the consumer drone market and with good reason. Among all the DJI consumer drones, the Mavic Pro has got to be our favorite. This cool, insectile looking little drone can stay aloft for more than 25 minutes, offer a flight range of several miles and comes with some excellent 4K shootings. However, there are some issues like crashing, unsupported file type when getting DJI Mavic Pro video to work in GoPro Studio, especially in 4K. So, how to import DJI Mavic Pro 4K video to GoPro Studio beautifully?
 According to GoPro Studio official statement, GoPro Studio supports importing the following files in "Step 1: Import & Convert":
MP4 video files from the original HD Hero Original, HD Hero 2, HERO3, and HERO3+.
MOV video files from Canon and Nikon DSLRs (except in Windows 8).
JPG files from GoPro HD Hero, Hero 2 and Hero 3 cameras (.jpgs from other sources may work, but have not been tested nor are they officially supported).
And GoPro Studio supports importing the following file formats directly for editing in "Step 2: Edit": GoPro CineForm AVI or MOV files (MOV only on Mac). Audio formats: MP3, WAV, AIFF, M4A and CAF
While DJI Mavic Pro records:
Video:
MP4, MOV (MPEG-4 AVC/H.264)
Video Recording Modes:
C4K: 4096×2160 24p
4K: 3840×2160 24/25/30p
2.7K: 2720x1530 24/25/30p
FHD: 1920×1080 24/25/30/48/50/60/96p
HD: 1280×720 24/25/30/48/50/60/120p
However, GoPro Studio supports not all kinds of MP4/MOV formats, like some 4K MP4/MOV files with unacceptable high bitrate/resolution or big size from Mavic Pro. To be able to work with Mavic Pro 4K video files in GoPro Studio flawlessly, we would recommend transcoding them to a format that is well compatible with GoPro Studio.
Solution 1: Use GoPro Studio
To use GoPro Studio, you need to import the files, either .MP4 or .MOV, into Studio and then convert them to .AVI files, this is the normal process for Studio. Once converted, they can be edited as easily as GoPro files. At the conclusion, you can export the edited cut to a number of formats, including files intended for YouTube, Facebook and such. If you try to cut the original files, you get that message saying they are unsupported.
Solution 2: Use s a powerful alternative tool to GoPro Studio
Dimo Video Converter for Ultimate/Videomate is just suitable to your needs, which is an all-in-one video converter, player and editor. Overall, the program is the best Video Converter for DJI 4K footage. With this DJI 4K video converter, you can effortlessly transcode DJI Mavic Pro 4k MP4/MOV to AVI/H.264 MP4, which will create an GoPro Studio friendly file format keeping the DJI original quality.
Besides GoPro Studio, this software can also export DNxHD for Avid MC, MPEG-2 for Sony Vegas, Premiere Pro/Element, WMV for Windows Movie Maker and more NLE systems for native editing, even MP4 foriPhone/iPad/VLC/Kodi/QuickTime for playback smoothly. What's more, this video app allows you to trim clips, crop videos, add effects, insert watermark, etc as GoPro Studio does. For Mac(OS Sierra) users, Dimo Video Converter Ultimate for Mac is the alternative choice. Just download it and follow the tutorial below to get the work done.
According to GoPro Studio official statement, GoPro Studio supports importing the following files in "Step 1: Import & Convert":
MP4 video files from the original HD Hero Original, HD Hero 2, HERO3, and HERO3+.
MOV video files from Canon and Nikon DSLRs (except in Windows 8).
JPG files from GoPro HD Hero, Hero 2 and Hero 3 cameras (.jpgs from other sources may work, but have not been tested nor are they officially supported).
And GoPro Studio supports importing the following file formats directly for editing in "Step 2: Edit": GoPro CineForm AVI or MOV files (MOV only on Mac). Audio formats: MP3, WAV, AIFF, M4A and CAF
While DJI Mavic Pro records:
Video:
MP4, MOV (MPEG-4 AVC/H.264)
Video Recording Modes:
C4K: 4096×2160 24p
4K: 3840×2160 24/25/30p
2.7K: 2720x1530 24/25/30p
FHD: 1920×1080 24/25/30/48/50/60/96p
HD: 1280×720 24/25/30/48/50/60/120p
However, GoPro Studio supports not all kinds of MP4/MOV formats, like some 4K MP4/MOV files with unacceptable high bitrate/resolution or big size from Mavic Pro. To be able to work with Mavic Pro 4K video files in GoPro Studio flawlessly, we would recommend transcoding them to a format that is well compatible with GoPro Studio.
Solution 1: Use GoPro Studio
To use GoPro Studio, you need to import the files, either .MP4 or .MOV, into Studio and then convert them to .AVI files, this is the normal process for Studio. Once converted, they can be edited as easily as GoPro files. At the conclusion, you can export the edited cut to a number of formats, including files intended for YouTube, Facebook and such. If you try to cut the original files, you get that message saying they are unsupported.
Solution 2: Use s a powerful alternative tool to GoPro Studio
Dimo Video Converter for Ultimate/Videomate is just suitable to your needs, which is an all-in-one video converter, player and editor. Overall, the program is the best Video Converter for DJI 4K footage. With this DJI 4K video converter, you can effortlessly transcode DJI Mavic Pro 4k MP4/MOV to AVI/H.264 MP4, which will create an GoPro Studio friendly file format keeping the DJI original quality.
Besides GoPro Studio, this software can also export DNxHD for Avid MC, MPEG-2 for Sony Vegas, Premiere Pro/Element, WMV for Windows Movie Maker and more NLE systems for native editing, even MP4 foriPhone/iPad/VLC/Kodi/QuickTime for playback smoothly. What's more, this video app allows you to trim clips, crop videos, add effects, insert watermark, etc as GoPro Studio does. For Mac(OS Sierra) users, Dimo Video Converter Ultimate for Mac is the alternative choice. Just download it and follow the tutorial below to get the work done.
Free Download Dimo Video Converter Ultimate (Win/Mac):


Other Download:
How to Convert DJI Mavic Pro 4K H.264 MP4/MOV for Editing in GoPro Studio
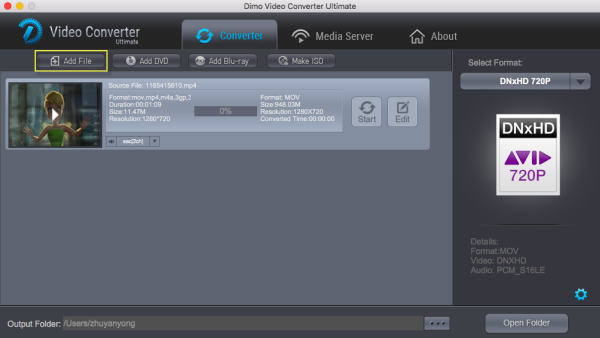
Step 1: Install and run Dimo Video Converter Ultimate, and then click the "Add File" button to load the Mavic Pro 4k videos.
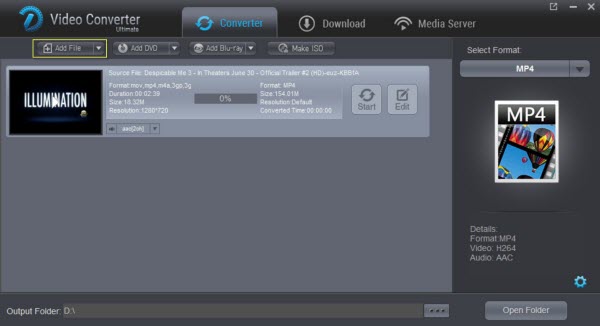 Step 2: Click "Select Format" bar and choose AVI or MP4 from "Format > Video" or "Format > HD Video" as output format on the drop-down menu.
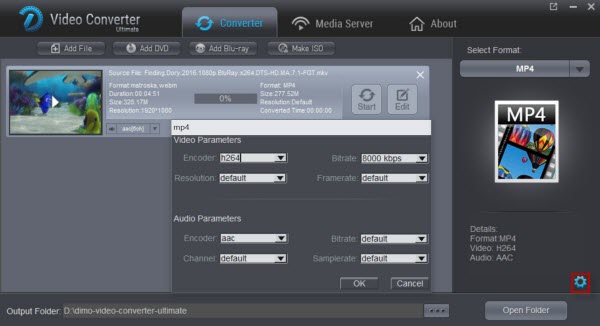
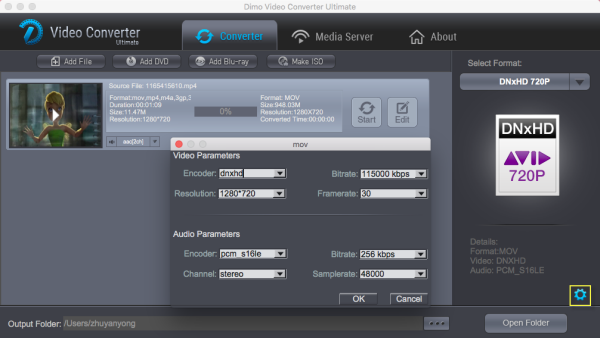
Tip: Click the Settings icon to adjust video and audio parameters on the Profile Setting as you need to get the best quality video. To down-convert ultra HD 4K to 1080p, do remember adjusting video size to 1920*1080. That is the exact 1080p.
Step 2: Click "Select Format" bar and choose AVI or MP4 from "Format > Video" or "Format > HD Video" as output format on the drop-down menu.
Tip: Click the Settings icon to adjust video and audio parameters on the Profile Setting as you need to get the best quality video. To down-convert ultra HD 4K to 1080p, do remember adjusting video size to 1920*1080. That is the exact 1080p.
 Step 3: Simply click the "Start" button to start converting and everything else will be automated. If you have added quite a bunch of video files, it would take some time to convert. You're done. Now your DJI Mavic Pro 4K H.264 MP4/MOV files will be converted into AVI/MP4 files ready to be imported to GoPro Studio perfectly.
Free Download or Purchase Dimo Video Converter Ultimate:
Step 3: Simply click the "Start" button to start converting and everything else will be automated. If you have added quite a bunch of video files, it would take some time to convert. You're done. Now your DJI Mavic Pro 4K H.264 MP4/MOV files will be converted into AVI/MP4 files ready to be imported to GoPro Studio perfectly.
Free Download or Purchase Dimo Video Converter Ultimate:


 Kindly Note:
The price of Dimo Video Converter Ultimate for Windows is divided into 1 Year Subscription, Lifetime/Family/Business License: $43.95/Year; $45.95/lifetime license; $95.95/family license(2-4 PCs); $189.95/business pack(5-8 PCs). Get your needed one at purchase page.
Contact us or leave a message at Facebook if you have any issues.
Related Articles:
Source: Get 4K video from DJI Mavic Pro to wok in GoPro Studio
Kindly Note:
The price of Dimo Video Converter Ultimate for Windows is divided into 1 Year Subscription, Lifetime/Family/Business License: $43.95/Year; $45.95/lifetime license; $95.95/family license(2-4 PCs); $189.95/business pack(5-8 PCs). Get your needed one at purchase page.
Contact us or leave a message at Facebook if you have any issues.
Related Articles:
Source: Get 4K video from DJI Mavic Pro to wok in GoPro Studio
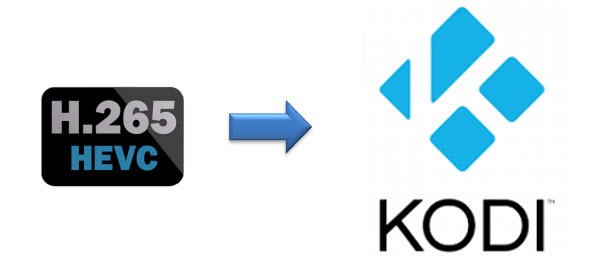
Kodi has become one of the most popular ways to watch TV and movies. With the growth of smaller PCs, on-demand streaming and downloadable content, it has never been simpler to bring your favourite flicks into your living room, and Kodi is possibly the best way to do it. Got some new files in H.265 codec and wanna add them on your Kodi (originally known as XBMC - or 'Xbox Media Center')? However, it seems a bit complicated as Kodi won't open 4K H.265 as expected.
 Q1: H.265 video play terrible on kodi on ts451A
I have some H.265 video, I played them on kodi 16 & 17,but the frame droped terrible and video and voice didn't sync. I checked the cpu ocupy is 100%. I want to know if the ts451's cpu not strong enough or the kodi is not work proper for H.265. It's seem's that the hardware accelerate didn't work.
Q2: Android Box with h.265 hardware encoding issue
I have an android box right now that I purchased back in 2015 which works ok for my h.264 videos off of my nas. Putting together my archive has been great but my drive is starting to fill up so I have started converting the videos over to h.265 for Kodi and the results are good. I figure I will have at minimum 40% more space once they are converted.
Q1: H.265 video play terrible on kodi on ts451A
I have some H.265 video, I played them on kodi 16 & 17,but the frame droped terrible and video and voice didn't sync. I checked the cpu ocupy is 100%. I want to know if the ts451's cpu not strong enough or the kodi is not work proper for H.265. It's seem's that the hardware accelerate didn't work.
Q2: Android Box with h.265 hardware encoding issue
I have an android box right now that I purchased back in 2015 which works ok for my h.264 videos off of my nas. Putting together my archive has been great but my drive is starting to fill up so I have started converting the videos over to h.265 for Kodi and the results are good. I figure I will have at minimum 40% more space once they are converted.
Unfortunately my older Android Box doesn't decode the h.265 videos very well or good at all. I have been looking at newer generic boxes that support h.265 decoding some of them also have more memory and storage which should be good. However picking the correct CPU/GPU setup is difficult. I hope someone can give me some real world suggestions. Thanks a lot.
Q3: Looking for a streaming bo supports H265
As the title suggests I'm looking for a replacement for my trusted WDTV. Been using it for years now. Very reliable. But with the H.265 and new stuff coming out need to upgrade.
I'm looking for a simple box that supports h265 and h264 and other video codecs as well as audio codecs like Dolby AAX and dts. Just wanna play my tv shows and movies that I download. Streaming from Kodi would be a big plus.
Q4: Kodi stutters (badly) when playing HEVC content
Kodi stutters unbearably when playing any HEVC content. All drivers on my system are up to date, and Kodi is set to run with the Nvidia GPU (optimus system). I can also confirm that hardware-acelerated decode is both enabled (in Kodi) and is working with HEVC (using DXVA Checker's trace mode). Is there any other way to see what the problem might be? The stutter is so bad, Kodi hangs up momentarily and then resumes playback choppily up to a point, then resumes again.
Isn't it possible to play 4K H.265 on Kodi? Yes, Kodi (version 14 onwards) offers decoding support for HEVC. (Refer to Kodi HEVC support here) However, lag, out of sync and drop frames issues still exist when playing. Worse still, if your streaming box or devices support HEVC hardware decoding, or have too low power SoCs to support smooth software playback, you will still fail to copy H.265 videos to Kodi for watching.
See the below limitations:
1. The Intel Celeron N3060 (Braswell) has limited GPU decoding support of x256
http://ark.intel.com/products/91832/Intel-Celeron-Processor-N3060-2M-Cache-up-to-2_48-GHz
2. Only 8bit and not 10bit are supported
https://communities.intel.com/thread/59216?tstart=0
3. Streaming Boxes and Console Support
Here's a quick rundown of popular media playing devices that don't support HEVC:
- Google's Chromecast (first and second generations)
- Apple TV (although some reports suggest 1080p HEVC playback is possible by running VLC on a 4th-gen model)
- Roku (third-gen models and earlier)
- Amazon Fire TV (2014) and Fire TV Stick
- Any Western Digital WD TV products
- All PlayStation consoles (including PS4 Pro)
- Xbox 360
And here are the media players that do support HEVC:
- Roku 4
- Amazon Fire TV (2015) and 2nd-gen Fire TV Stick
- Xbox One
In this situations, to add and view H.265 files on Kodi, the easy workaround is convert H.265 to a more common video format like MP4, MKV, AVI, MPG, etc.. Actually, it is not so hard as you image. What you need is just a common video converter like Dimo Video Converter Ultimate is a great H.265 tool to help you out. It features a simple yet sleek interface and performs files conversion with fast speed enables you to complete the H.265 to Kodi supported H.264 codec task with least quality loss in just a few clicks at your fingertips.
Apart from that, its built-in editor can help users to do some basic editing work before conversion, like trimming, cutting, adding effect/watermark etc. What's more, it also offers the optimal profiles for iPhone, iPad, iPod, Apple TV,TV, PS4 Pro, Xbox One S and more. For Mac users, please get Dimo Video Converter Ultimate for Mac to have a try. Download it from below and read further to know how to successfully convert your H.265 video files into Kodi supported H.264 within clicks.
Free Download Dimo Video Converter Ultimate (Win/Mac):
Other Download:
How to convert H.265 video to Kodi format
1. > Install and run the best H.265 converter for Kodi and transfer your ripped, downloaded H.265 movies or video recordings like from Samsung NX1/NX500, DJI Inspire 2 to the program.
2. > Click "Select Format" bar and choose H.264 MP4 or MKV from "Format > Video" or "Format > HD Video" as the output format.
What are the file formats supported by Kodi
Container formats: AVI, MPEG, WMV, ASF, FLV, MKV/MKA (Matroska), QuickTime, MP4, M4A, AAC, Ogg, OGM, RealMedia RAM/RM/RV/RA/RMVB, 3gp
Video formats: MPEG-1, MPEG-2, H.263, MPEG-4 SP and ASP, MPEG-4 AVC (H.264), H.265 (as from Kodi 14) HuffYUV, MJPEG, RealVideo, RMVB, WMV
Audio formats: MIDI, AIFF, WAV/WAVE, AIFF, MP2, MP3, AAC, DTS, ALAC, AMR, FLAC, RealAudio, WMA
3D video formats: Passive 3D video formats such as SBS, TAB, anaglyph or interlaced
Tip: Click the Settings icon to adjust video and audio parameters, like audio & video bitrate, video size, channel as you need.
3. Click the "Start" icon after all settings, and the H.265 Video Converter will start transcoding H.265 to Kodi preferred format immediately. After the conversion, get the output files by clicking the Open button. After that, you can copy, stream or transfer the converted Blu-ray videos to XBMC for smooth playback at ease without any problem.
If your files are MKV, VOB, H.265, FLV, XAVC, MOV, WMV, Tivo recording files, camera files like MXF, MTS, or Blu-ray, DVD disc format, Dimo Video Converter Ultimate can also be the best partner with your Kodi. It can help you convertDVD, Blu-ray and SD/HD/4K videos to Kodi friendly video with the best quality to expand your movie enjoyment. What’s more, this all-in-one video converter allows you to tweak the video size, bitrate, frame rate, audio codec, etc to get a decent video as you want.
Free Download or Purchase Dimo Video Converter Ultimate:
Kindly Note:
The price of Dimo Video Converter Ultimate for Windows is divided into 1 Year Subscription, Lifetime/Family/Business License: $43.95/Year; $45.95/lifetime license; $95.95/family license(2-4 PCs); $189.95/business pack(5-8 PCs). Get your needed one at purchase page.
Contact us or leave a message at Facebook if you have any issues.
Related Articles:
Source: How to add H.265 to Kodi for playback
Inspire 2 and Zenmuse X5S camera are true Hollywood-grade production tools that are designed with filmmakers in mind. The new CineCore 2.0 image processing system on the Inspire 2 makes the Zenmuse X5S capable of capturing 5.2K 30fps CinemaDNG video and Apple ProRes video as well as 4K 60fps using H.264 and 4K 30fps using H.265 (both at 100Mbps). When you got a DJI Inspire 2 and recorded some 4K videos with it, you may seek for a tutorial for the post workflow when dealing with Zenmuse X5S 4K H.265 footage. In this tutorial, I will share a guide on how to import DJI Zenmuse X5S 4K H.265 to Davinci Resolve for further editing. If you are in the trouble getting Zenmuse X5S 4K video to Resolve, just read on to get some hints.
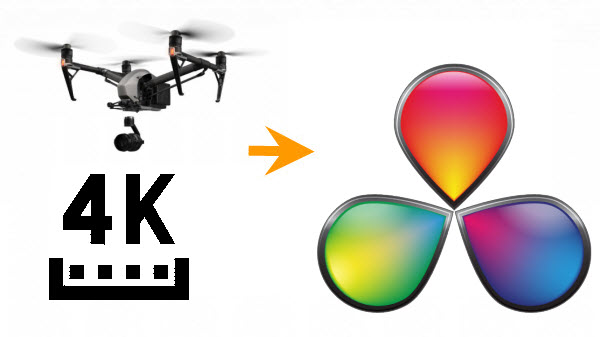 Well, according to our multiple testing, we found two main basic reasons behind there. As you know Zenmuse X5S records 4K H.265 videos, but it seems Davinci Resolve (including Resolve 12.5) does not like the way. Davinci Resolve 12.5, 11 can handle (usually) 4K files without much problem, but it is extremely hardware intensive. What'more, as a new-emerging codec, H.265/HEVC is not supported by Davinci Resolve.
The easy workaround to edit Zenmuse X5S 4K H.265 videos in Davinci Resolve is to convert the 4K H.265 to a more editing-friendly format for Davinci Resolve. If you're a professional users, you must know that the most suitable format is MOV which is encoded by DNxHD codec. Therefore, a Mac 4K to DNxHD Converter can be a good assistant.
Overall, Dimo Video Converter Ultimate for Mac is best Video Converter for Zenmuse X5S footage. With this Zenmuse X5S H.265/4K video converter, you can effortlessly transcode Zenmuse X5S 4K H.265 to DNxHD encoded MOV, which will creat a Davinci Resolve friendly file format keeping the original quality. Besides Resolve, this software can also export DNxHD for Avid MC, Apple ProRes for Final Cut Pro, MPEG-2 for Adobe Premiere and more NLE systems for native editing. Windows uers can turn to the Windows version here. Below is the detailed guide on converting Zenmuse X5S H.265 clips to Davinci Resolve friendly videos for smoothly editing.
Free Download Dimo Video Converter Ultimate for Mac/Win:
Other Download:
Convert DJI Zenmuse X5S 4K H.265 to DNxHD for editing in Davinci Resolve
1. Load Source 4K H.265 Video Files
Install and launch the 4K Video Converter on your Mac. Then, press the "Add File" button to add 4K H.265 video file from Zenmuse X5S into the program.
Well, according to our multiple testing, we found two main basic reasons behind there. As you know Zenmuse X5S records 4K H.265 videos, but it seems Davinci Resolve (including Resolve 12.5) does not like the way. Davinci Resolve 12.5, 11 can handle (usually) 4K files without much problem, but it is extremely hardware intensive. What'more, as a new-emerging codec, H.265/HEVC is not supported by Davinci Resolve.
The easy workaround to edit Zenmuse X5S 4K H.265 videos in Davinci Resolve is to convert the 4K H.265 to a more editing-friendly format for Davinci Resolve. If you're a professional users, you must know that the most suitable format is MOV which is encoded by DNxHD codec. Therefore, a Mac 4K to DNxHD Converter can be a good assistant.
Overall, Dimo Video Converter Ultimate for Mac is best Video Converter for Zenmuse X5S footage. With this Zenmuse X5S H.265/4K video converter, you can effortlessly transcode Zenmuse X5S 4K H.265 to DNxHD encoded MOV, which will creat a Davinci Resolve friendly file format keeping the original quality. Besides Resolve, this software can also export DNxHD for Avid MC, Apple ProRes for Final Cut Pro, MPEG-2 for Adobe Premiere and more NLE systems for native editing. Windows uers can turn to the Windows version here. Below is the detailed guide on converting Zenmuse X5S H.265 clips to Davinci Resolve friendly videos for smoothly editing.
Free Download Dimo Video Converter Ultimate for Mac/Win:
Other Download:
Convert DJI Zenmuse X5S 4K H.265 to DNxHD for editing in Davinci Resolve
1. Load Source 4K H.265 Video Files
Install and launch the 4K Video Converter on your Mac. Then, press the "Add File" button to add 4K H.265 video file from Zenmuse X5S into the program.
 2. Set Output Format
Hit "Select Format" bar to select output format. You can choose "Format > Editor" and choose Avid Media Composer as output format. It is an ideal editing format for Resolve.
3. 4K Video Settings
Click "Settings" button if you'd like to customize advanced audio and video parameters like Video Codec, aspect ratio, bit rate, frame rate, Audio codec, sample rate, audio channels. Here you are recommended to set the video size as 1920*1080 to realize 4K to 1080p compressing for Davinci Resolve, which can't support raw 4K video well.
2. Set Output Format
Hit "Select Format" bar to select output format. You can choose "Format > Editor" and choose Avid Media Composer as output format. It is an ideal editing format for Resolve.
3. 4K Video Settings
Click "Settings" button if you'd like to customize advanced audio and video parameters like Video Codec, aspect ratio, bit rate, frame rate, Audio codec, sample rate, audio channels. Here you are recommended to set the video size as 1920*1080 to realize 4K to 1080p compressing for Davinci Resolve, which can't support raw 4K video well.
 4. Start Conversion
After confirming everything is alright, click the "Start" button on the bottom right to launch the conversion. Since 4K video file is usually very large, please be more patient for the conversion. Thereafter, import, play and edit Zenmuse X5S 4K H.265 videos in DaVinci Resolve 12/11/10/9 freely! After editing, you can freely share edited videos on youriPhone/iPad/Android devices or TV with Dimo free Media Server as you like.
Related Software:
BDmate (Mac/Win)
Lossless backup Blu-ray to MKV with all audio and subtitle tracks; Rip Blu-ray to multi-track MP4; Convert Blu-ray to almost all popular video/audio formats and devices; Copy Blu-ray to ISO/M2TS; Share digitized Blu-ray wirelessly.
DVDmate (Mac/Win)
A professional DVD ripping and editing tool with strong ability to remove DVD protection, transcode DVD to any video and audio format, and edit DVD to create personal movie.
8K Player (Mac/Win)
A mixture of free HD/4K video player, music player, Blu-ray/DVD player, video recorder and gif maker.
4. Start Conversion
After confirming everything is alright, click the "Start" button on the bottom right to launch the conversion. Since 4K video file is usually very large, please be more patient for the conversion. Thereafter, import, play and edit Zenmuse X5S 4K H.265 videos in DaVinci Resolve 12/11/10/9 freely! After editing, you can freely share edited videos on youriPhone/iPad/Android devices or TV with Dimo free Media Server as you like.
Related Software:
BDmate (Mac/Win)
Lossless backup Blu-ray to MKV with all audio and subtitle tracks; Rip Blu-ray to multi-track MP4; Convert Blu-ray to almost all popular video/audio formats and devices; Copy Blu-ray to ISO/M2TS; Share digitized Blu-ray wirelessly.
DVDmate (Mac/Win)
A professional DVD ripping and editing tool with strong ability to remove DVD protection, transcode DVD to any video and audio format, and edit DVD to create personal movie.
8K Player (Mac/Win)
A mixture of free HD/4K video player, music player, Blu-ray/DVD player, video recorder and gif maker.
Free Download or Purchase Dimo Video Converter Ultimate for Mac/Win:

 Kindly Note:
The price of Dimo Video Converter Ultimate for Mac is divided into 1 Year Subscription, Lifetime/Family/Business License: $43.95/Year; $45.95/lifetime license; $95.95/family license(2-4 Macs); $189.95/business pack(5-8 Macs). Get your needed one at purchase page.
Contact us or leave a message at Facebook if you have any issues.
Related Articles:
Source: Editing DJI Zenmuse X5s 4K H.265 Footage in Davinci Resolve
Kindly Note:
The price of Dimo Video Converter Ultimate for Mac is divided into 1 Year Subscription, Lifetime/Family/Business License: $43.95/Year; $45.95/lifetime license; $95.95/family license(2-4 Macs); $189.95/business pack(5-8 Macs). Get your needed one at purchase page.
Contact us or leave a message at Facebook if you have any issues.
Related Articles:
Source: Editing DJI Zenmuse X5s 4K H.265 Footage in Davinci Resolve
QNAP TS-453 Pro, featuring the easy-to-use QTS operating system, is a powerful, reliable, secure and scalable NAS solution designed for mission-critical business applications and to meet fast growing data storage needs. If you have a QNAP NAS (TS-453 Pro) device, you probably would like to copy your beloved Blu-ray collection to NAS(network attached storage device) to allow you to stream and play via multiple computers, TV, iPad, iPhone, Android phone, media streamers (Xbox, PS4, Roku, WD TV, Apple TV) or media players. Read the following article to learn the easy sollution for backing up Blu-ray movies to QNAP NAS (TS-453 Pro) drive.
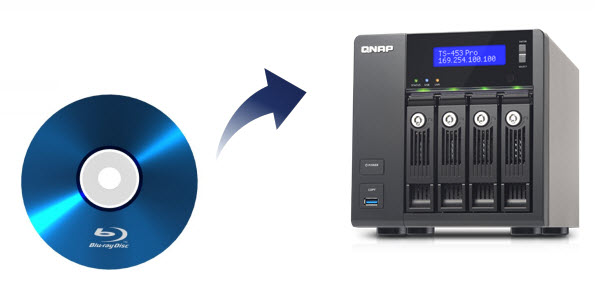 Almost all Blu-ray movies are encrypted with copy protection. Decryption keys are stored in the normally inaccessible lead-in area of the disc. You’ll usually get an error if you try to copy the contents of an encrypted Blu-ray to NAS, even the copied m2ts files. Therefore, to store dozens of Blu-ray movies to QNAP NAS (TS-453 Pro) device, you need to get the content off the Blu-ray disc as a protection-free and easily readable element for NAS.
In this case, powerful third-party software for ripping Blu-ray to NAS is what you need. There are many, many Blu-ray ripping tools on the market. I've tired a pile of them. Dimo Video Converter Ultimate for Mac is the best one I've tried yet. It is capable of ripping Blu-ray to MP4, AVI, MKV for QNAP NAS (TS-453 Pro) streaming with no quality loss; it also enables you to copy Blu-ray main movies for backup onto NAS in lossless mkv format. Best of all, it allows you to backup Blu-ray to ISO for storage and playback later. If you are running on Windows PC, turn to Dimo Video Converter Ultimate. If you haven't got the software, download it now and let's start the conversion.
Free Download Dimo Video Converter Ultimate for Mac/Win:
Other Download:
How to rip and copy Blu-rays to QNAP NAS (TS-453 Pro)
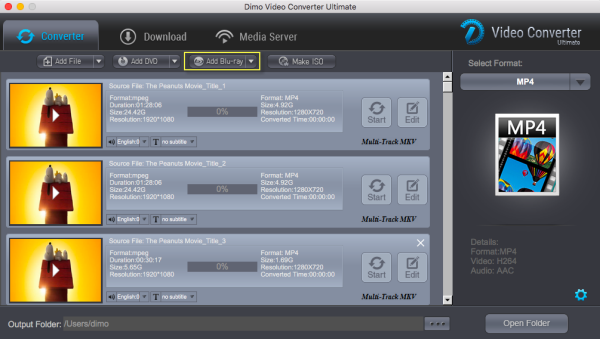
STEP 1. Add Blu-ray files
Launch the Blu-ray ripping program for NAS devices. Then click "Add Blu-ray" to import the Blu-ray files you want to convert. To select the audio track you like, simply click the audio track option and select the one you prefer. Not only Blu-ray, but also DVD and other SD/HD/4K videos are all supported including H.265.
Tip: If you want to transfer Blu-ray to QNAP NAS (TS-453 Pro) retaining Blu-ray quality and you have a lot of spare space, you can choose "Make ISO" to copy Blu-ray disc to an iso. That makes one file for the Blu-ray. Make sure your media streamer can read .iso files first.
Almost all Blu-ray movies are encrypted with copy protection. Decryption keys are stored in the normally inaccessible lead-in area of the disc. You’ll usually get an error if you try to copy the contents of an encrypted Blu-ray to NAS, even the copied m2ts files. Therefore, to store dozens of Blu-ray movies to QNAP NAS (TS-453 Pro) device, you need to get the content off the Blu-ray disc as a protection-free and easily readable element for NAS.
In this case, powerful third-party software for ripping Blu-ray to NAS is what you need. There are many, many Blu-ray ripping tools on the market. I've tired a pile of them. Dimo Video Converter Ultimate for Mac is the best one I've tried yet. It is capable of ripping Blu-ray to MP4, AVI, MKV for QNAP NAS (TS-453 Pro) streaming with no quality loss; it also enables you to copy Blu-ray main movies for backup onto NAS in lossless mkv format. Best of all, it allows you to backup Blu-ray to ISO for storage and playback later. If you are running on Windows PC, turn to Dimo Video Converter Ultimate. If you haven't got the software, download it now and let's start the conversion.
Free Download Dimo Video Converter Ultimate for Mac/Win:
Other Download:
How to rip and copy Blu-rays to QNAP NAS (TS-453 Pro)
STEP 1. Add Blu-ray files
Launch the Blu-ray ripping program for NAS devices. Then click "Add Blu-ray" to import the Blu-ray files you want to convert. To select the audio track you like, simply click the audio track option and select the one you prefer. Not only Blu-ray, but also DVD and other SD/HD/4K videos are all supported including H.265.
Tip: If you want to transfer Blu-ray to QNAP NAS (TS-453 Pro) retaining Blu-ray quality and you have a lot of spare space, you can choose "Make ISO" to copy Blu-ray disc to an iso. That makes one file for the Blu-ray. Make sure your media streamer can read .iso files first.
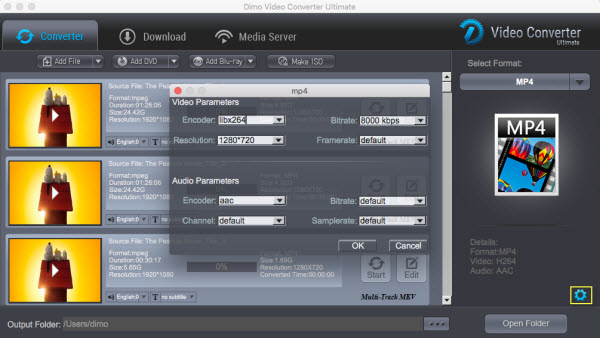
 STEP 2. Choose an output format
Click "Select Format" bar and choose your desired format.
a. If you want to store hundreds of Blu-ray's on NAS, then rip the Blu-ray to .avi, .mp4, .mkv, etc compressed format. And what I've learned is that MP4 would be one best target format for it is fully compatible with nearly all media devices including iPad, iPhone, Xbox, Apple TV, etc.
Then click Settings bar, you can adjust the level of compression to suit the quality you want. Remember the file size and video quality is based more on bitrate than resolution which means bitrate higher results in big file size, and lower visible quality loss.
STEP 2. Choose an output format
Click "Select Format" bar and choose your desired format.
a. If you want to store hundreds of Blu-ray's on NAS, then rip the Blu-ray to .avi, .mp4, .mkv, etc compressed format. And what I've learned is that MP4 would be one best target format for it is fully compatible with nearly all media devices including iPad, iPhone, Xbox, Apple TV, etc.
Then click Settings bar, you can adjust the level of compression to suit the quality you want. Remember the file size and video quality is based more on bitrate than resolution which means bitrate higher results in big file size, and lower visible quality loss.
 b. Besides the wide range of supported formats, you can also backup Blu-ray to lossless mkv to keep 5.1/7.1 surround sound and subtitles. Or convert Blu-ray to multi-track MP4 for Blu-ray playback with different languages. You can alsocustomize settings and change the encoder, resolution, frame rate, bitrate for video and encoder, channel, sample rate and bitrate for audio.
c. If you only need to copy the main movie of Blu-ray as M2TS streams without extras, you can directly copy Blu-ray movies to .m2ts streams for free playback on common media players with high quality with another Blu-ray copy -BDmate for Mac/Win.
STEP 3. Start copying Blu-ray to QNAP TS-453 Pro NAS drive
Press the "Start" button to start ripping Blu-ray movies to QNAP NAS (TS-453 Pro). When the conversion finishes, click Open button to find the output files. Make sure the wireless network connection is accessible among the NAS and your device. Then, you can stream and watch the high quality Blu-ray movies from NAS on multiple computers, Tablet, Phone, smart TV, HD Media Players, Game Console, or other devices at ease.
Note: The TS-453 Pro will also delivers superior real-time Full HD video transcoding to convert videos to formats that can be smoothly played on PCs, mobile devices and Smart TVs. With the benefit of offline transcoding, if you can only connect to an Internet connection with limited/restricted bandwidth, you can still enjoy smooth videos by selecting a pre-rendered lower resolution to play the videos via File Station, Video Station, or the Qfile mobile app without affecting the TS-453 Pro's system performance running other applications.
Free Download or Purchase Dimo Video Converter Ultimate for Mac/Win:
Kindly Note:
The price of Dimo Video Converter Ultimate for Mac is divided into 1 Year Subscription, Lifetime/Family/Business License: $43.95/Year; $45.95/lifetime license; $95.95/family license(2-4 Macs); $189.95/business pack(5-8 Macs). Get your needed one at purchase page.
Contact us or leave a message at Facebook if you have any issues.
Related Articles:
Source: Backup Blu-ray into QNAP NAS (TS-453 Pro) for TV playing
b. Besides the wide range of supported formats, you can also backup Blu-ray to lossless mkv to keep 5.1/7.1 surround sound and subtitles. Or convert Blu-ray to multi-track MP4 for Blu-ray playback with different languages. You can alsocustomize settings and change the encoder, resolution, frame rate, bitrate for video and encoder, channel, sample rate and bitrate for audio.
c. If you only need to copy the main movie of Blu-ray as M2TS streams without extras, you can directly copy Blu-ray movies to .m2ts streams for free playback on common media players with high quality with another Blu-ray copy -BDmate for Mac/Win.
STEP 3. Start copying Blu-ray to QNAP TS-453 Pro NAS drive
Press the "Start" button to start ripping Blu-ray movies to QNAP NAS (TS-453 Pro). When the conversion finishes, click Open button to find the output files. Make sure the wireless network connection is accessible among the NAS and your device. Then, you can stream and watch the high quality Blu-ray movies from NAS on multiple computers, Tablet, Phone, smart TV, HD Media Players, Game Console, or other devices at ease.
Note: The TS-453 Pro will also delivers superior real-time Full HD video transcoding to convert videos to formats that can be smoothly played on PCs, mobile devices and Smart TVs. With the benefit of offline transcoding, if you can only connect to an Internet connection with limited/restricted bandwidth, you can still enjoy smooth videos by selecting a pre-rendered lower resolution to play the videos via File Station, Video Station, or the Qfile mobile app without affecting the TS-453 Pro's system performance running other applications.
Free Download or Purchase Dimo Video Converter Ultimate for Mac/Win:
Kindly Note:
The price of Dimo Video Converter Ultimate for Mac is divided into 1 Year Subscription, Lifetime/Family/Business License: $43.95/Year; $45.95/lifetime license; $95.95/family license(2-4 Macs); $189.95/business pack(5-8 Macs). Get your needed one at purchase page.
Contact us or leave a message at Facebook if you have any issues.
Related Articles:
Source: Backup Blu-ray into QNAP NAS (TS-453 Pro) for TV playing
As one of the primary formats for Apple QuickTime, the QuickTime MOV videos are commonly used by Mac users. However, MOV files are always proved to be large and uncompressed file that may take up too much room on your computer or hard drive, even it's not easy to upload to popular video websites like YouTube or share video files with someone who doesn't have a Mac, and so on.
 If so, converting QuickTime MOV to MP4 can be your best choice as MP4 is more flexible than MOV files, it can be opened with almost all media players. Also, this file format is indeed more gadget friendly than its counterpart. Given this, we share ways on how to convert QuickTime movie to MP4 on Windows (10/8/7/Vista), Mac (El Capitan/macOS Sierra) with fastest speed and high quality, so that you can free enjoy your QuickTime MOV files anywhere and anytime.
Here Dimo Video Converter Ultimate for Windows or Mac, a versatile MOV to MP4 conversion program, is highly recommended to convert MOV videos files to MP4 and more other video formats like AVI, M4V, FLV, WMV, MPEG to enjoy the thrill of video. Moreover, its built-in editor allows you to adjust the video effects for better visual enjoyment. Apart from that, using the free build-in media server, you could easily share all converted QuickTime MOV file to any devices with ease.
If so, converting QuickTime MOV to MP4 can be your best choice as MP4 is more flexible than MOV files, it can be opened with almost all media players. Also, this file format is indeed more gadget friendly than its counterpart. Given this, we share ways on how to convert QuickTime movie to MP4 on Windows (10/8/7/Vista), Mac (El Capitan/macOS Sierra) with fastest speed and high quality, so that you can free enjoy your QuickTime MOV files anywhere and anytime.
Here Dimo Video Converter Ultimate for Windows or Mac, a versatile MOV to MP4 conversion program, is highly recommended to convert MOV videos files to MP4 and more other video formats like AVI, M4V, FLV, WMV, MPEG to enjoy the thrill of video. Moreover, its built-in editor allows you to adjust the video effects for better visual enjoyment. Apart from that, using the free build-in media server, you could easily share all converted QuickTime MOV file to any devices with ease.
Free Download Dimo Video Converter Ultimate (Win/Mac):
Other Download:
How to convert QuickTime MOV to MP4 for Playing on Windows or Mac
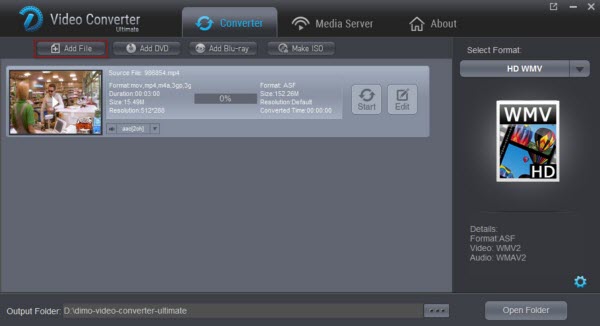
Step 1. Load MOV to the best video Converter
Free download this fastest QuickTime to mp4 converter for Windows (10/8/7/Vista) on PC or the QuickTime MOV to MP4 converter for Mac version. Run it and click "Add File" to load the QT video files you want to convert.
Step 2 Choose compatible MP4 format
To convert QuickTime file to mp4 format, choose "MP4" from the popping-up windows as the output format after clicking "Select Format" > "Format" > "Video". For the output QuickTime HD MP4 videos, you can also choose HD MP4 from "HD Video".
 Note: For experienced user, if you do know how to tweak the profiles, you can manually adjust the quality and compression options to reduce the mov file size, customize the video settings, etc. using "Setting" button. For novices, you can ignore these since the default settings produces a great result.
Step 3. Start MOV to MP4 conversion
After completing the setup, now, just click the "Start" button to start converting QuickTime .mov file to .mp4.
Wait for the application to convert the MOV file you imported to MP4 (H.264/MPEG-4 AVC). A little blue bar will appear showing the progress of the operation. The conversion process time may take a few minutes or more, vary depending on the size of MOV videos and quality you choose for the MP4 files.
Note: For experienced user, if you do know how to tweak the profiles, you can manually adjust the quality and compression options to reduce the mov file size, customize the video settings, etc. using "Setting" button. For novices, you can ignore these since the default settings produces a great result.
Step 3. Start MOV to MP4 conversion
After completing the setup, now, just click the "Start" button to start converting QuickTime .mov file to .mp4.
Wait for the application to convert the MOV file you imported to MP4 (H.264/MPEG-4 AVC). A little blue bar will appear showing the progress of the operation. The conversion process time may take a few minutes or more, vary depending on the size of MOV videos and quality you choose for the MP4 files.
Free Download or Purchase Dimo Video Converter Ultimate:
Kindly Note:
The price of Dimo Video Converter Ultimate for Windows is divided into 1 Year Subscription, Lifetime/Family/Business License: $43.95/Year; $45.95/lifetime license; $95.95/family license(2-4 PCs); $189.95/business pack(5-8 PCs). Get your needed one at purchase page.
Contact us or leave a message at Facebook if you have any trouble to convert QuickTime MOV to MP4 file with Windows or Mac.
Related Articles: