Windows Media Player has various multimedia functions; it can be used to play movies, documentaries, audio-video clips etc. In some cases, MOV files are not recognized in Windows Media Player. One of the main reasons that MOV files may fail to play is due to technical issues. That may occur when the user does not have the plug-ins needed to play the MOV videos. Another problem could be with the QuickTime MOV codec. Installing a QuickTime player could solve the codec problem. However, the QuickTime player is big-sized, and it will install junks to your computer. In this article, we aim to work out the fastest solution to help you play QuickTime with Windows Media Player smoothly.
 Actually, it's not as difficult as you imagine. What you need is a just a common video converter like Dimo Video Converter Ultimate to help you watch MOV on Windows Media Player without any hassle. And you could get wonderful output files and never worry about out of audio/video sync. More than that, it also provides an access to touch up QuickTime MOV videos, which including trimming, cropping, appending artistic effects and more. If you are Mac users, please turn to Dimo Video Converter Ultimate for Mac (macOS Sierra, OS X El Capitan included). The guide below will teach you how to convert and play MOV on Windows Movie Player so you can open movies with MOV, MP4, Tivo, WMV, Blu-ray and other video files.
Free Download Dimo Video Converter Ultimate (Win/Mac):


Other Download:
How to convert QuickTime MOV to Windows Media Player?
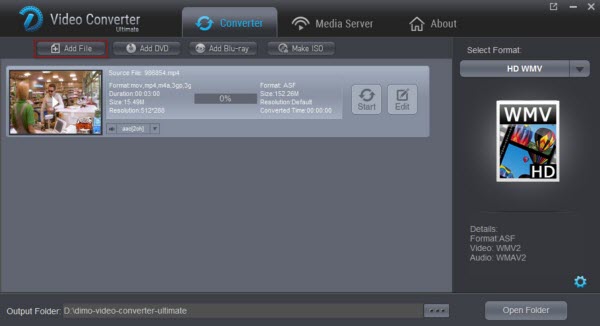
Step 1. Add QuickTime MOV video
Start up the QuickTime MOV to Windows Media Player converter, and then click "Add File" to import all QuickTime MOV files.
Step 2. Choose output compatible format with Windows Media Player
Click the "Select Format" menu, select Windows Media Player friendly format as your output video format. There, you can take WMV as your output video format. If you prefer high definition videos, move your mouse pointer to "HD Video" and then choose HD WMV. To get the more compressive file, "MP4" and "HD MP4" can be your better choice.
 Tips: The smart MOV file converter additionally offers some useful edit functions to enhance your video. Click the "Edit" button to explore more features with Dimo Video Converter Ultimate.
STEP 3. Start converting QuickTime MOV to Windows Media Player
Click "Start" button to enable QuickTime MOV to WMV/MP4 conversion for playing with Windows Media Player. The conversion process will take a while, and you'll see an encoding progress bar.
Once finished, click the "Open" button in the main interface and you can locate the encoded MOV files effortlessly. And then you are able to use these files in Windows Media Player as you want.
Free Download or Purchase Dimo Video Converter Ultimate:
Tips: The smart MOV file converter additionally offers some useful edit functions to enhance your video. Click the "Edit" button to explore more features with Dimo Video Converter Ultimate.
STEP 3. Start converting QuickTime MOV to Windows Media Player
Click "Start" button to enable QuickTime MOV to WMV/MP4 conversion for playing with Windows Media Player. The conversion process will take a while, and you'll see an encoding progress bar.
Once finished, click the "Open" button in the main interface and you can locate the encoded MOV files effortlessly. And then you are able to use these files in Windows Media Player as you want.
Free Download or Purchase Dimo Video Converter Ultimate:


 Kindly Note:
The price of Dimo Video Converter Ultimate for Windows is divided into 1 Year Subscription, Lifetime/Family/Business License: $43.95/Year; $45.95/lifetime license; $95.95/family license(2-4 PCs); $189.95/business pack(5-8 PCs). Get your needed one at purchase page.
Contact us or leave a message at Facebook if you have any trouble to convert QuickTime MOV for importing to Windows Media Player as you want.
Related Articles:
Source: Will Windows Media Player play QuickTime MOV? Solved!
Kindly Note:
The price of Dimo Video Converter Ultimate for Windows is divided into 1 Year Subscription, Lifetime/Family/Business License: $43.95/Year; $45.95/lifetime license; $95.95/family license(2-4 PCs); $189.95/business pack(5-8 PCs). Get your needed one at purchase page.
Contact us or leave a message at Facebook if you have any trouble to convert QuickTime MOV for importing to Windows Media Player as you want.
Related Articles:
Source: Will Windows Media Player play QuickTime MOV? Solved!
As 4K-resolution cameras falling into consumers' hands, such as BlackMagic Design Production Camera, Leica D-LUX, Panasonic LUMIX DMC-GH4K/FZ1000, Sony Alpha a7S, GoPro Hero4 Black, Canon EOS 1D-C, etc. In this situation, if you recorded some 4K videos with your 4K camcorder, you may prefer to edit them before sharing with friends or uploading to YouTube or 4K TV. Then the question arises. Will editing programs like Premiere Pro CC support 4K videos?
 Granted, Premiere Pro CC 7 (2017 included), CS6 can handle (usually) 4K files without much problem, but it is extremely hardware intensive. You probably don't like to invest a new computer, that means dead end? Humh, of course not, but you do need to transcode 4K video to Premiere Pro using MPEG-2 (1080p) as primary delivery format. Here we will discuss how to edit 4K footage with Premiere Pro without bogging down your computer.
How to import and edit 4K video in Premerie Pro CC successfully?
To get a best solution for 4K video and finish the 4K video conversion task, the best Mac 4K video converter app,Dimo Video Converter Ultimate for Mac, is your best choice to transcode DJI, Nikon, Sony, Blackmagic, GoPro, Panasonic, Canon 4K video to Premerie Pro CC codec. With it, you can effortlessly transcode transcode 4K video, H.264(MP4), XAVC, XAVC S, etc footage to MPEG-2 for Premiere Pro.
What's more, it supports converting 4K files to various non-linear editing systems (NLE), including Avid Media Composer, Final Cut Pro, Camtasia Studio and more. If you work 4K files in Adobe Premiere Pro on Windows PC, please get Dimo Video Converter Ultimate to solve the issues.
Free Download Dimo Video Converter Ultimate for Mac/Win:
Other Download:
Convert 4K video files for Adobe Premiere Pro CS6/CC/CS6/CS5/CS4
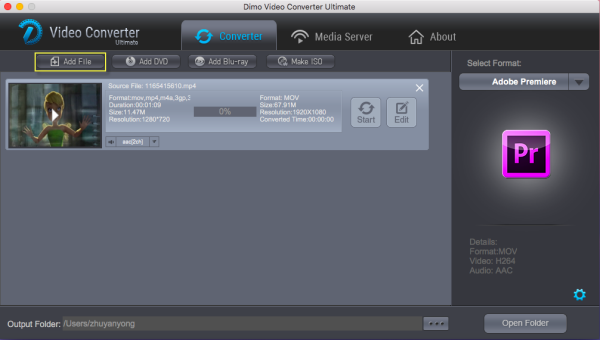
Step 1. Load 4K Files
Run the program you just install, and drag and drop the 4K video files to the 4K converter. You can also hit "Add File" button to import videos to the app.
Step 2. Choose output format
Click "Select Format" bar and choose "Format" > "Editor" > "Adobe Premiere" as output format for editing 4K in Adobe with natively supported video codec.
Granted, Premiere Pro CC 7 (2017 included), CS6 can handle (usually) 4K files without much problem, but it is extremely hardware intensive. You probably don't like to invest a new computer, that means dead end? Humh, of course not, but you do need to transcode 4K video to Premiere Pro using MPEG-2 (1080p) as primary delivery format. Here we will discuss how to edit 4K footage with Premiere Pro without bogging down your computer.
How to import and edit 4K video in Premerie Pro CC successfully?
To get a best solution for 4K video and finish the 4K video conversion task, the best Mac 4K video converter app,Dimo Video Converter Ultimate for Mac, is your best choice to transcode DJI, Nikon, Sony, Blackmagic, GoPro, Panasonic, Canon 4K video to Premerie Pro CC codec. With it, you can effortlessly transcode transcode 4K video, H.264(MP4), XAVC, XAVC S, etc footage to MPEG-2 for Premiere Pro.
What's more, it supports converting 4K files to various non-linear editing systems (NLE), including Avid Media Composer, Final Cut Pro, Camtasia Studio and more. If you work 4K files in Adobe Premiere Pro on Windows PC, please get Dimo Video Converter Ultimate to solve the issues.
Free Download Dimo Video Converter Ultimate for Mac/Win:
Other Download:
Convert 4K video files for Adobe Premiere Pro CS6/CC/CS6/CS5/CS4
Step 1. Load 4K Files
Run the program you just install, and drag and drop the 4K video files to the 4K converter. You can also hit "Add File" button to import videos to the app.
Step 2. Choose output format
Click "Select Format" bar and choose "Format" > "Editor" > "Adobe Premiere" as output format for editing 4K in Adobe with natively supported video codec.
 Tips: Click "Setting" button if you'd like to customize advanced audio and video parameters like Video Codec, aspect ratio, bit rate, frame rate, Audio codec, sample rate, audio channels. However, please keep it default as original if you want to get original 4K resolution.
Step 3. Start converting 4K files
Tab the "Start" button of this fastest 4K Video Converter. It will start to transcode 4K for importing to Adobe Premiere Pro immediately. Soon after the conversion, just click "Open" button to get the generated files for natively editing in Premiere Pro CC 2017 as well as CC7/CS6/CS5/CS4/CS3 perfectly.
Other tips to get best Premiere Pro CC Settings:
1. Disable High-Quality Playback, gets you apx. 5-10% performance (Player Window/Wrench Icon/High Qaulity Playback).
INFO: Mercury Engine Transmit to second monitor, takes away apx. 5-10% performance (Player Window/Wrench Icon/Enable Transmit).
2. RedCode/Cineform movie files: Set playback resolution to 1/2 or 1/4 size will increase performace apx. 10-20% (Player Window/Full-1/2-1/4,etc.)
3. Increase Playback Preroll and Postroll time to 3-8 seconds for smoother playback, especially with slower harddrives (Edit/Preferences/Playback/Preroll-Postroll).
4. Disable Lumetri Scopes if not needed. They have been optimized in PP 2015.3 but you loose 3-8% performance when enabled (Window/Lumetri Scopes).
Free Download or Purchase Dimo Video Converter Ultimate for Mac/Win:
Tips: Click "Setting" button if you'd like to customize advanced audio and video parameters like Video Codec, aspect ratio, bit rate, frame rate, Audio codec, sample rate, audio channels. However, please keep it default as original if you want to get original 4K resolution.
Step 3. Start converting 4K files
Tab the "Start" button of this fastest 4K Video Converter. It will start to transcode 4K for importing to Adobe Premiere Pro immediately. Soon after the conversion, just click "Open" button to get the generated files for natively editing in Premiere Pro CC 2017 as well as CC7/CS6/CS5/CS4/CS3 perfectly.
Other tips to get best Premiere Pro CC Settings:
1. Disable High-Quality Playback, gets you apx. 5-10% performance (Player Window/Wrench Icon/High Qaulity Playback).
INFO: Mercury Engine Transmit to second monitor, takes away apx. 5-10% performance (Player Window/Wrench Icon/Enable Transmit).
2. RedCode/Cineform movie files: Set playback resolution to 1/2 or 1/4 size will increase performace apx. 10-20% (Player Window/Full-1/2-1/4,etc.)
3. Increase Playback Preroll and Postroll time to 3-8 seconds for smoother playback, especially with slower harddrives (Edit/Preferences/Playback/Preroll-Postroll).
4. Disable Lumetri Scopes if not needed. They have been optimized in PP 2015.3 but you loose 3-8% performance when enabled (Window/Lumetri Scopes).
Free Download or Purchase Dimo Video Converter Ultimate for Mac/Win:

 Kindly Note:
The price of Dimo Video Converter Ultimate for Mac is divided into 1 Year Subscription, Lifetime/Family/Business License: $43.95/Year; $45.95/lifetime license; $95.95/family license(2-4 Macs); $189.95/business pack(5-8 Macs). Get your needed one at purchase page.
Contact us or leave a message at Facebook if you have any issues of importing 4K to Premiere Pro CC.
More Articles:
Kindly Note:
The price of Dimo Video Converter Ultimate for Mac is divided into 1 Year Subscription, Lifetime/Family/Business License: $43.95/Year; $45.95/lifetime license; $95.95/family license(2-4 Macs); $189.95/business pack(5-8 Macs). Get your needed one at purchase page.
Contact us or leave a message at Facebook if you have any issues of importing 4K to Premiere Pro CC.
More Articles: